Getting Started
If you're following this documentation as a step-by-step guide, it is recommended to read the installation document first.
Configure the OAuth provider
Terraform authenticates users with OAuth 2.0. You will need credentials of an OAuth Application from one of the supported providers:
- GitHub
- BitBucket
- GitLab
Theemailandopenidscopes must be assigned for the GitLab OAuth application - OpenID Connect
For local development, you can set the homepage URL to http://localhost:5758 and the callback URL to http://localhost:5758/v1/api/auth/redirect.
The port 5758 is the default. If you decide to change it, you will also need to change it in the OAuth App settings.
Launch the server
Once you have the executable, create a new configuration file to add the minimum required configuration. While Terralist can be highly configured, the following settings are required and Terralist cannot operate without them:
oauth-provider: the OAuth provider you wish to use for your instance (e.g.github).- the OAuth provider configuration: it depends on what provider you selected (e.g. for GitHub,
gh-client-idandgh-client-secret); token-signing-secret: a random string to protect the tokens;cookie-secret: a random string to protect the cookies;
oauth-provider: github
gh-client-id: ${GITHUB_OAUTH_CLIENT_ID:default}
gh-client-secret: ${GITHUB_OAUTH_CLIENT_SECRET:default}
token-signing-secret: secret
cookie-secret: secret
The command above will create a configuration file that is instructing Terralist to read the GitHub OAuth credentials from the GITHUB_OAUTH_CLIENT_ID and GITHUB_OAUTH_CLIENT_SECRET environment variables. If those variables are not set in your environment, Terralist will start, but it will be unusable (as you cannot login).
Then, you can start the Terralist server:
If the server correctly started, you should see the following log line:
Interacting with Terraform/OpenTofu
Since the Terraform/OpenTofu CLI expects all responses to be from an HTTPS server, the standard localhost:5758 will not work for registry interactions.
In order to enable this, you should expose the Terralist server with an HTTPS endpoint. See local development for the available options.
CLI Authentication
You can authenticate in Terralist by using the login subcommand:
Create an authority
Authorities represent namespaces in Terralist. Every authority can have modules and providers uploaded to it.
To create a new authority, use the web dashboard. Access your Terralist instance by opening a browser and navigating to your TERRALIST_URL address (by default, it should be http://localhost:5758).
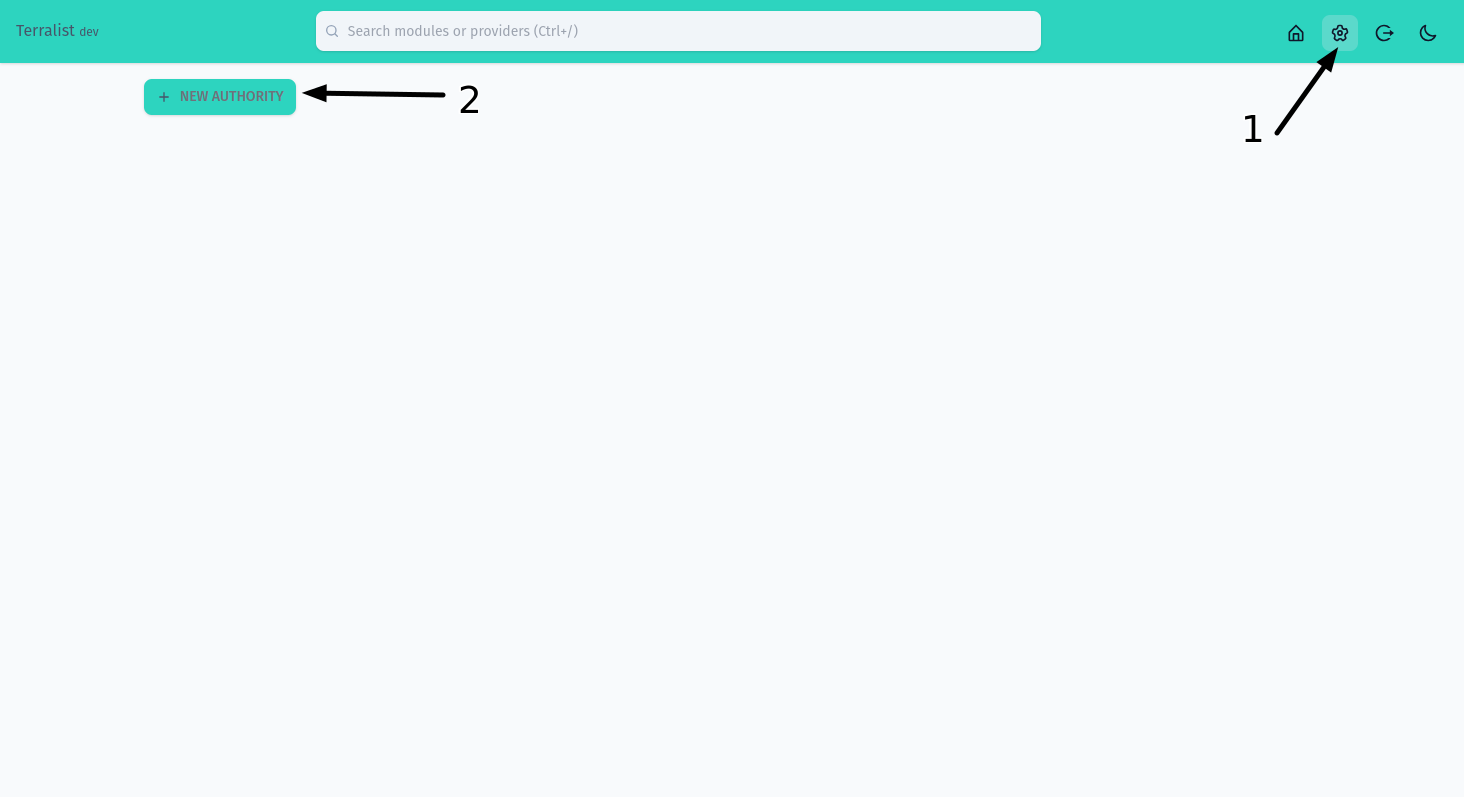
Open the settings page (step 1) and then press on the New Authority button (step 2).
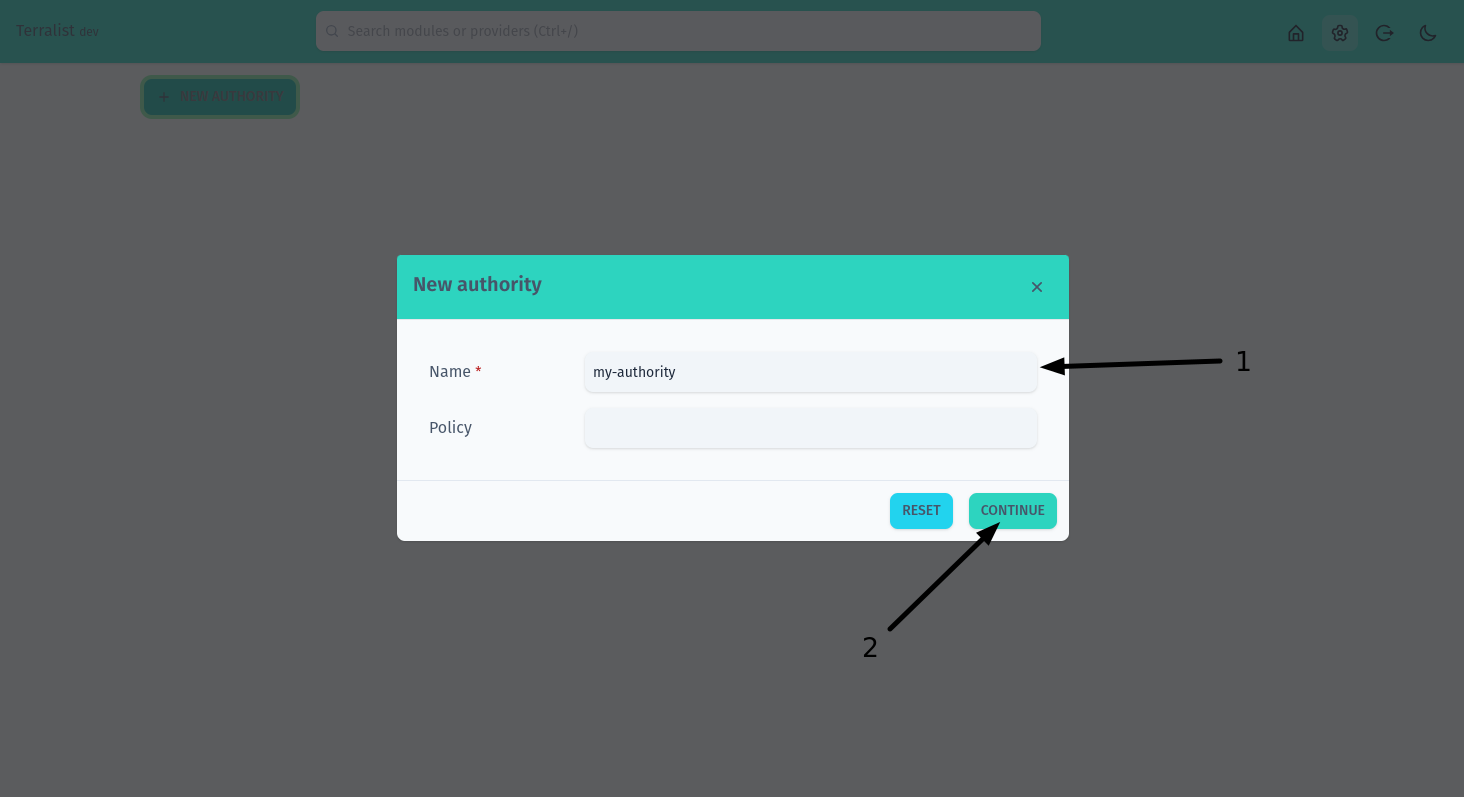
Fill in your authority details. Only the name is required (step 1). When you are done, press on the Continue button (step 2).
Terralist is case insensitive, so it doesn't matter if you choose to use upper-case letters here, but then you want to use lower-case letters in your TF files.
Once you have your authority, if you're planning to use it to host custom providers, you should add a signing key. Providers are signed with a GPG key and Terraform/OpenTofu use this registry-provided signing key to validate the authenticity of the newly downloaded provider.
Generate an API Key
API keys in Terralist are not tied to a specific authority. Each API key carries its own RBAC policies that define which resources, actions, and objects it can access, and a scope for organizational grouping. You can restrict it to a specific authority by using those policies.
To create a new API key, navigate to the Settings page and use the API Keys section. You will need to provide:
- Name: a human-readable name for the key.
- Scope: an organizational label (e.g.
team-a,infra,ci-deploy). Used for RBAC access control on the key itself. - Policies: one or more rules defining what the key can access (resource, action, object, effect).
If you're following this guide step-by-step, create an API key with the following policy to allow uploading modules and providers to your authority: resource *, action *, object my-authority/*, effect allow. Copy the generated key and export it as the TERRALIST_API_KEY environment variable.
Access to API key management requires RBAC permission on the api-keys resource. The built-in role:admin grants this by default. See the RBAC configuration for details.
Bootstrapping with a master API key
For automated setups (CI/CD pipelines, scripted deployments), you can configure a master API key that has full administrative access without requiring a web UI login:
This key can be used via the Authorization: Bearer x-api-key:<key> header or the X-API-Key header to create authorities, upload modules/providers, and manage API keys programmatically.
Upload a new module
To upload a new module, use Terralist's API:
curl -X POST http://localhost:5758/v1/api/modules/my-authority/my-module/provider/1.0.0/upload \
     -H "Authorization: Bearer x-api-key:$TERRALIST_API_KEY" \
     -d '{ "download_url": "/home/bob/terraform-modules/example-module" }'
Terralist uses the same library Terraform uses to make downloads go-getter, so the above example takes advantage of the fact that Terralist runs on your local computer and uses the local getter to "download" the module. If your Terralist server is deployed remotely, the above command should not work (since that particular path cannot resolve on the remote server).
Use the module
module "example-module" {
  source  = "localhost:5758/my-authority/my-module/provider"
  version = "1.0.0"

  // ...
}
Upload a new provider
To upload a new provider, use Terralist's API. First, create a payload file:
{
  "protocols": ["4.0", "5.1"],
  "shasums": {
    "url": "https://releases.hashicorp.com/terraform-provider-random/2.0.0/terraform-provider-random_2.0.0_SHA256SUMS",
    "signature_url": "https://releases.hashicorp.com/terraform-provider-random/2.0.0/terraform-provider-random_2.0.0_SHA256SUMS.sig"
  },
  "platforms": [
    {
      "os": "darwin",
      "arch": "amd64",
      "download_url": "https://releases.hashicorp.com/terraform-provider-random/2.0.0/terraform-provider-random_2.0.0_darwin_amd64.zip",
      "shasum": "55ced41e5f68730ef36272d4953f336a50f318c1d1d174665f5fa76cb5df08ae"
    },
    {
      "os": "linux",
      "arch": "amd64",
      "download_url": "https://releases.hashicorp.com/terraform-provider-random/2.0.0/terraform-provider-random_2.0.0_linux_amd64.zip",
      "shasum": "5f9c7aa76b7c34d722fc9123208e26b22d60440cb47150dd04733b9b94f4541a"
    }
  ]
}
Then, call the API to upload it:
curl -X POST localhost:5758/v1/api/providers/my-authority/random/2.0.0/upload \
     -H "Authorization: Bearer x-api-key:$TERRALIST_API_KEY" \
     -d "$(cat random-2.0.0.json)"
In order for this provider to be fully validated by Terraform/OpenTofu, you should add the public GPG key of the provider signer to your authority.